


 Have you ever come across changes made in Maximo and wonder who made them, when, and why? Have you ever been audited by a firm and been embarrassed of being asked a barrage of questions for which you had no clue as to how to answer them? If you ever found yourself in such a position, this blog article is a must read!
The purpose of this blog post is to help you understand the crucial importance of E-signatures an E-audits, which help you to accurately track changes made in your system, mitigate risk, increase efficiency, and enhance productivity in your organization. This article also demystifies the steps to configure E-signature and E-audit easily in your Maximo environment.
What Are E-signature and E-audit in Maximo, and Why Are They Game Changers?
In today's world of advanced science and technology, tracking changes is critical in a system, and for the survival of an organization. IBM therefore deemed important to equip Maximo Asset Management with the Maximo E-signature and E-audit license-free features.
Electronic signature verification, or simply E-signature, is an electronic signature (i.e., password) feature that IBM delivers with Maximo, and which instructs users to provide credentials and state a reason before they can modify records. This feature ensures that the individual who saves a record, changes a record, deletes a record or accesses a specific action is the actual person who logged in to the system. It prevents cases where authorized individuals leave their session open, and someone else makes changes using their credentials.
Unlike E-signatures, E-audits 1) track changes made to records, 2) keep copies of the changes, and 3) produce an audit trail. The electronic auditing function writes audit records to the database tables. The audit tables are configured for each business object that is enabled for auditing. We will learn more about the E-audits in the Enabling E-audits section. The history of any business data deemed sensitive can be tracked, for later retrieval.
Why Are These Two Features Significantly Beneficial for Your Organization?
All organizations need to adhere to rules and regulations, either internal or external. Adherence to such rules and regulations are confirmed through compliance audits. Maximo E-signature (electronic signature verification) and E-audits (electronic audit records) help you comply with audit and regulatory requirements in your organization. For instance, the Sarbanes-Oxley Act (SOX) may be a US federal law, but many foreign companies trading in the US must also comply with it.
What Are the Steps Involved in Setting up E-signature and E-audit in Maximo?
In the paragraph above, we have described why E-signature and E-audit are beneficial for your organization. Now, in a few easy steps, I will take you to the point where you can set up these features in your Maximo Enterprise Asset Management environment:
Configuring E-signature
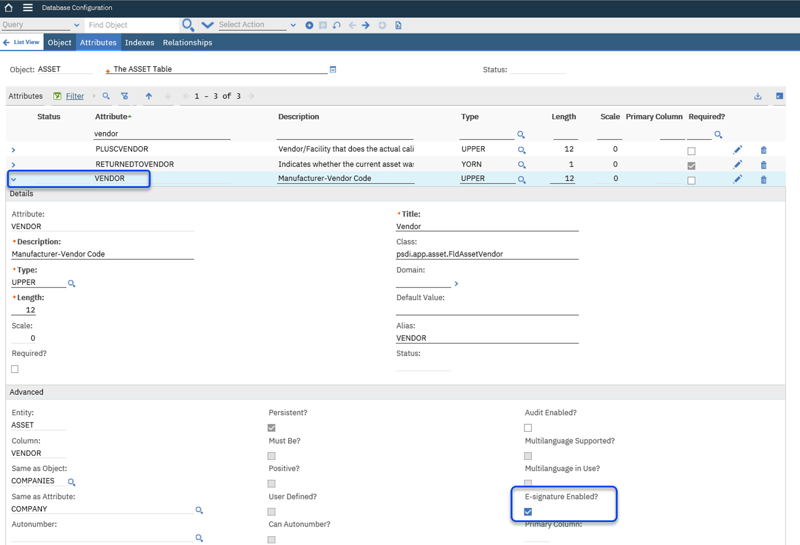
To enable Maximo E-signature, you first need to identify the Maximo Object and Attribute that need to have E-signature enabled. In this example we will use Asset as the Object, and Vendor as the Attribute.
We use the Database Configuration application to enable E-signature for the Object and Attribute.
- From the left navigation pane in the Maximo Start Center, navigate to System configuration > Platform Configuration > Database Configuration.
- Select the Asset object.
- From the Asset page, click the Attribute tab, and filter for Vendor. Expand View Details (arrow) under the Attributes section, and check the E-signature enabled box.
- Save the record.
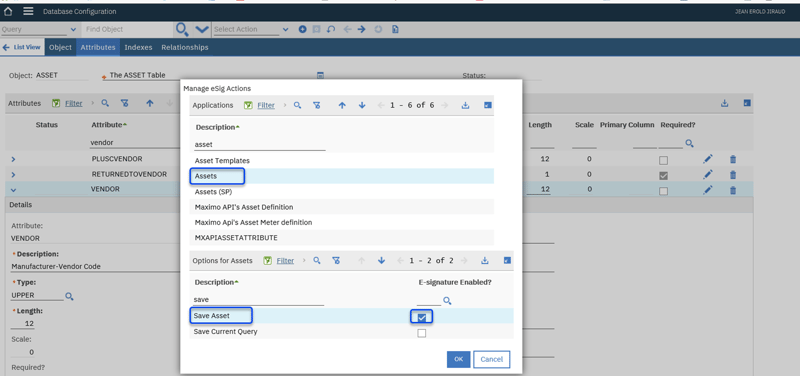
- From the Select Action Menu of the Database Configuration, click Manage eSig Actions
- From Manage eSig Actions window, filter for Asset, then select Assets from the list
- In the Options for Assets section, filter for Save, then select Save Asset.
- On the right-hand side of Save Asset, place a check mark in the field, then click OK. Do the same for the New action.
 Notes
Notes
• By performing this action, all existing (saved) assets in the system will have E-signature enabled.
• E-signature can also be enabled on newly created assets. For this, you need to enable E signature on New under options for Assets.
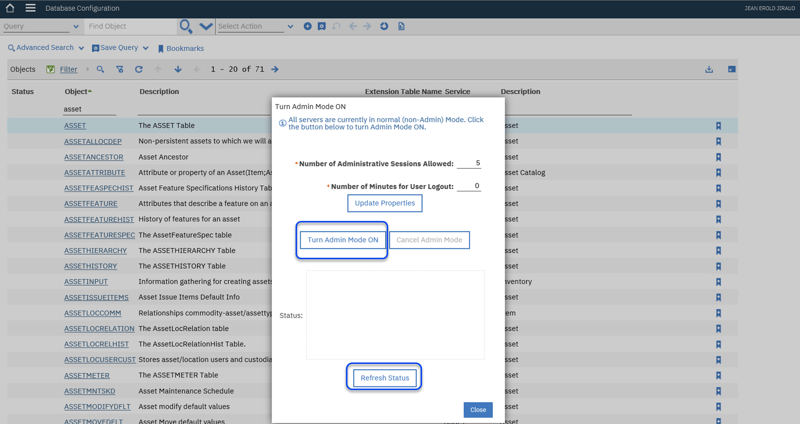
• Depending on your Maximo configuration, Manage eSig Actions might be located under More Actions on the left-hand side of the Database Configuration application window. - Now, you need to turn on Admin Mode in order to apply the configuration changes. From the Database Configuration application, click Select Action Menu, then click Manage Admin Mode.
- Click Turn Admin Mode ON, enter the administrator password, wait a few seconds, click Refresh Status, and once successfully completed, click OK.
 Notes: Before turning on Admin Mode, end users who are logged in to the system must be notified and should log out after saving their jobs.
After turning on Admin Mode, navigate to the Select Actions menu, then click Apply Configuration Changes, then initiate the database configuration by clicking Start Configuration Database. You can click Refresh Status until the successful message is displayed, then click OK.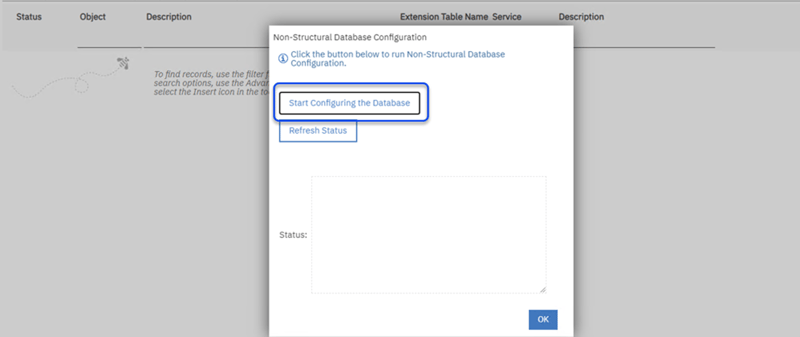 Notes: Remember to turn off Admin Mode after completing the Apply Configuration Changes.
- You have successfully enabled E-signature on the Asset object and Vendor attribute and have applied the changes to the database. Now, let’s confirm that everything was done correctly. - Navigate to the Asset Application, and select any asset.
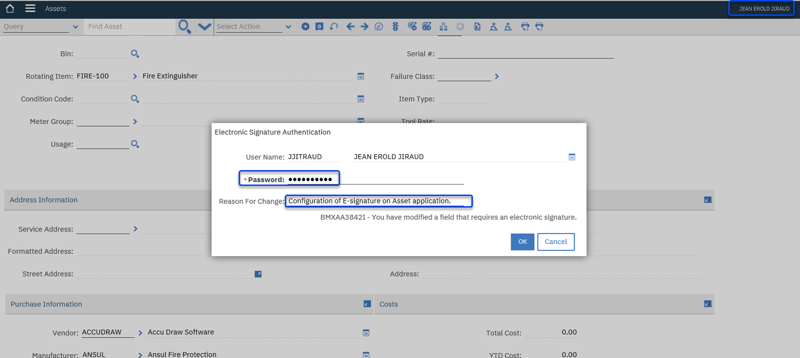
- Scroll down. In the Purchase Information section, select a different vendor, then click the Save Asset button to save the record. You will then be prompted to enter your password and the reason for the change.
 - At this point, we have validated that E signature was enabled on the Asset object and Vendor attribute.
- At the Database level, let’s verify the change made by user JJITRAUD in the Asset object and Vendor attribute by executing the following SQL query against the LOGINTRACKING table:
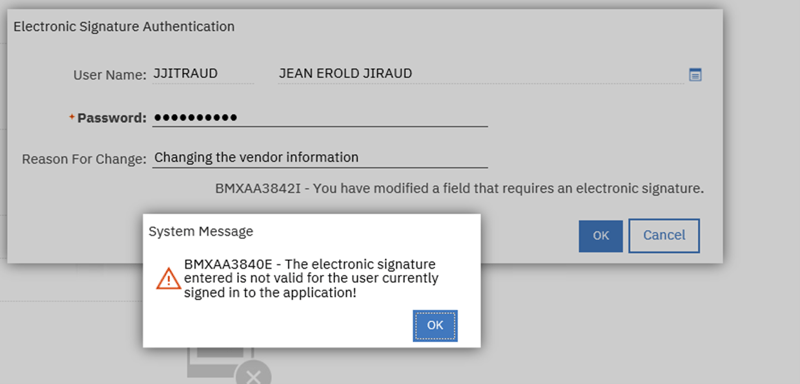
- In the event Jean Erold Jiraud has forgotten his password, or if he leaves the application open and someone else attempts to change a record, if that person enters a wrong password (E signature), the system will simply deny the change and throw out the failed attempt system message: BMXAA3840E, and write the attempt result (failed) to the database (object logintracking)
The Electronic Signature Authentication window includes the following fields:
| Field | Description | Importance |
| User Name | Login ID of the user | Required |
| Full User Name, Unlabeled | DISPLAYNAME attribute in the PERSON object | Read-only |
| Password | Electronic signature password that the user created in the Set or Modify E-Signature Key window in their user profile | Required |
| Reason for Change | Reason for the change Maximum length is 50 characters |
Required |
Logintracking Table
All verification attempts are saved in the LOGINTRACKING table. The LOGINTRACKING table records the following items:
- Username or login ID
- Full username, which is the person's display name
- Date and time of the attempt
- Whether or not the authentication was successful
- Application name where the electronic signature was invoked
- Reason for the change, as typed on the Electronic Signature Authentication window
- Unique transaction identifier
- Key value columns for the record

Enabling E-audits
Just like E-signature, the E-audit feature also enables the Database Configuration application. When E-audit is set up on an object, a new object of the same name with an "A_" prefix is created; it is the audit table. For example, setting up E-audit on the Asset object will create A_ASSET.
- For further details on audit tables, see the Electronic Audit Tables section.
To enable electronic audits, you need to select an object. In this example, we have selected the Asset object:
- Open the Database Configuration application by navigating to System Configuration > Platform Configuration > Database Configuration.
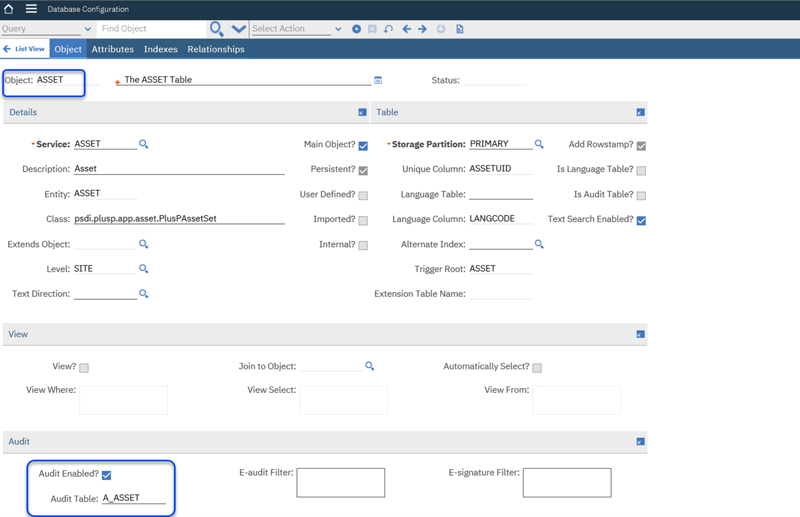
- In the Database Configuration application, select the Asset object that you want to audit.
- In the Audit section of the Object tab, check the Audit Enabled box.
- Save the record.
- From the More Actions menu (or Select Actions menu), refresh the database by applying configuration changes.
 - E-audit can also be enabled on attributes. As shown below, E-audit was enabled on the Vendor attribute by simply checking the Audit Enabled box. Again, for the change to take effect, you must apply configuration changes.
Note: For certain objects and attributes, we do not have to turn on Admin Mode to update them for E-audit. Instead, simply apply configuration changes.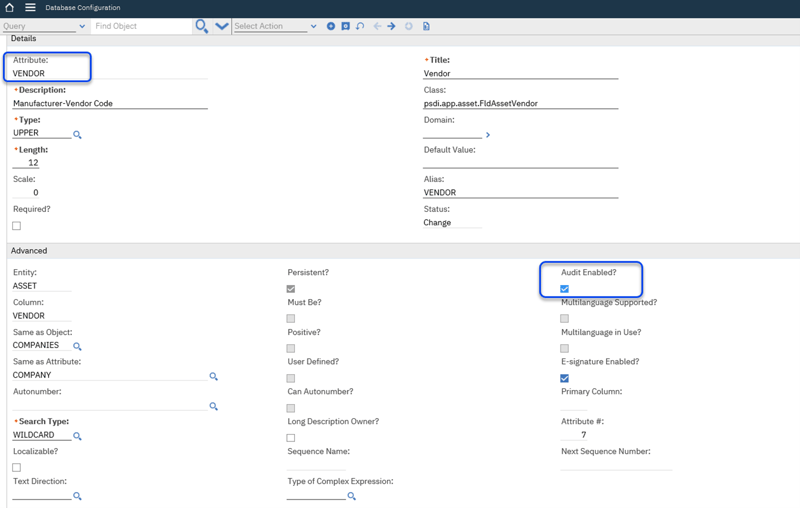
Electronic Audit Tables
What is an audit table? An audit table is nothing more than an object that the MAXTABLECFG.EAUDITTBNAME column references to. Now, in the section Enabling E-audits, where we have enabled E-audit on the Asset object, let’s query the MAXTABLECFG.EAUDITTBNAME column to validate if the A_ASSET audit table was created.
 - As you can see, the R-audit table A-ASSET was created.
E-Audit Testing
Remember E-audit was enabled on the Vendor attribute. We have also enabled E-audit on two other attributes: FAILURECODE and SERIALNUM in the same Asset object. Now, we can test and validate that E-audit works as expected by modifying the VENDOR, FAILURECODE and SERIANUM records of an Asset in Asset Application, then query the A_ASSET E-audit table for validation.
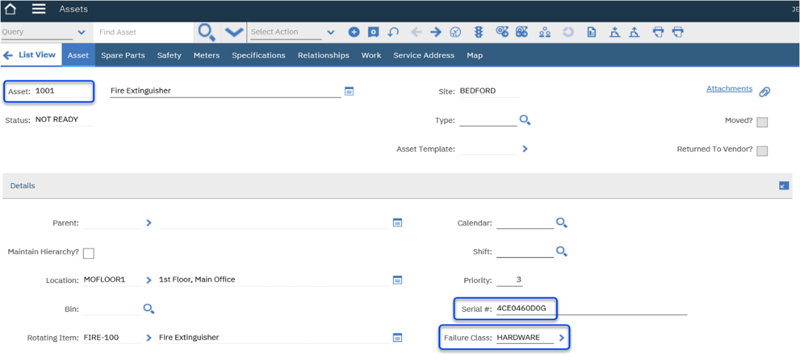
- Navigate to Asset application, then filter for any Asset. In this example, I have opened asset number 1001.
- Scroll down to the Details section, then enter 4CE0460D0G in the Serial# field.
- Select HARDWARE as Failure Class.
- Scroll down further. In the Purchase Information section, change the Vendor record to ACME (Acme Computer Global).
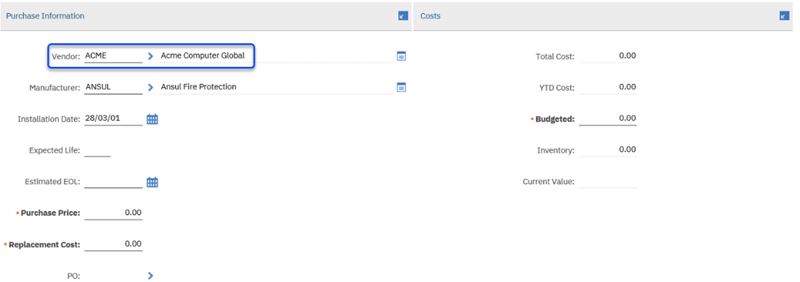
- Save the record.
- Now, you can query the E-audit table A_ASSET to confirm that the audit records were written to that audit table.
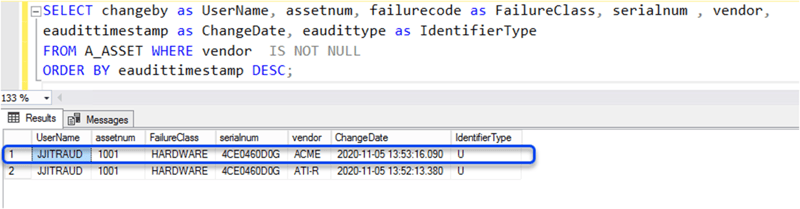 - As you can see, the records were written to the E-audit table A_ASSET. We can also notice that the type of change that was made on asset number 1001 was an Update (eaudittype:U).
- The next section lists the items that are included in an audit record.
List of Items in an Audit Record
The audit record includes the following items:
- The username of the user who changed the data.
- A copy of the changed data of each attribute for which electronic audit is enabled.
- The identifier that indicates whether the change was an insertion, update or deletion.
- The date and time of the transaction.
- The row stamp.
- The unique electronic audit transaction ID.
- The unique e-Sig transaction ID if electronic signature is enabled.
- The key value columns for the record (what I called affected element), even if those columns are not electronic audit enabled. For example, the Asset number is recorded even when another attribute in the ASSET object triggers the electronic audit.
Security breaches are a real threat, the wave of compromised data is on the rise. Among the six well known network attacks, unauthorized access is ranked number one in enterprise networks. Electronic signature verification and electronic audit records play an important role in compliance audits and regulatory requirements. Enabling these key features in your Maximo EAM environment will give you peace of mind. You won’t be lost when it comes to access an audit report or look for specific data to answer whatever inquiry addressed to you during auditing.
I hope you found this article useful. If you would like to obtain more information or have any questions about these features, please do not hesitate to get in touch with us. We can help you meet your compliance and risk mitigation needs.


